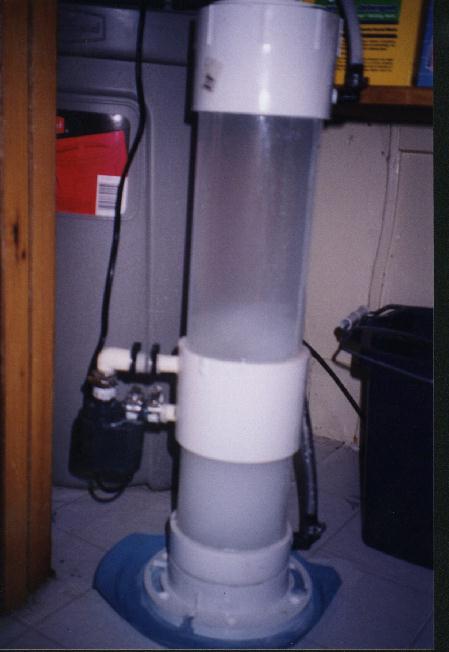
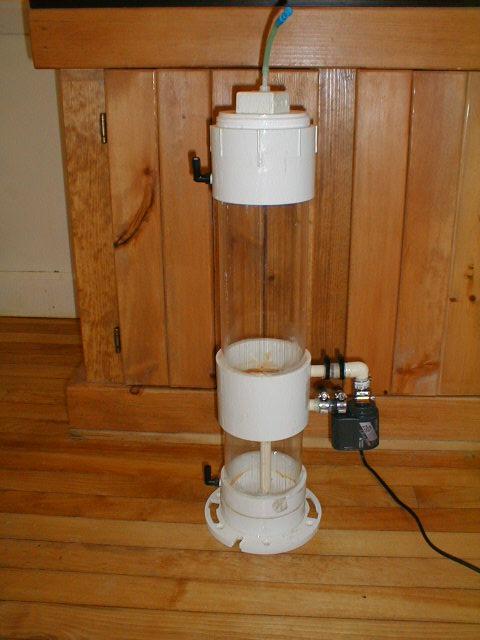
but I will give you some insight into the problems I encountered building it and as to it's performance. Below is a picture of my reactor in action. The differences in my version will be described below:
I seem to be getting lazier by the day. First I bought a pH probe so I wouldn't
have to keep checking my pH. Then I set up my two Tap Water Purifiers to output
into a 35 gallon can so I wouldn't have to make DI water once a week. Then I bought
a Reef-Filler top off pump so I wouldn't have to manually replace the evaporated
water daily. Then I started dosing b-ionic because I didn't want the hassle of dripping
kalkwasser. And now I've constructed a Nilsen Kalk reactor so I don't have to dose
b-ionic. The next step will be to buy a Lazy Boy Recliner to place in front of the
tank!
I'm not going to detail the plans as they are available on the Web at http://camelreef.free.fr/equipment/equipment.html#kalk
but I will give you some insight into the problems I encountered building it
and as to it's performance. Below is a picture of my reactor in action. The differences
in my version will be described below:
I suggest you also read the article
by Nicolas Will which explains why this method for dosing kalk is a good idea.
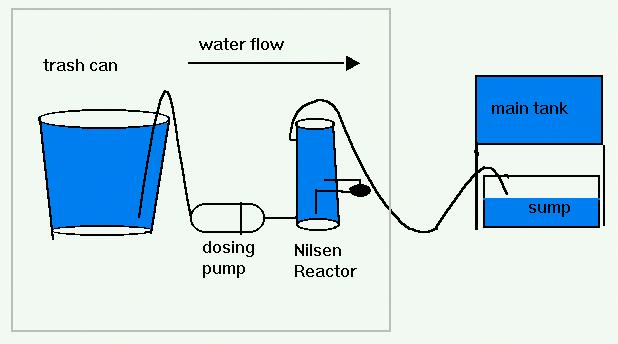
So let's start with the construction, or more accurately, the procurement of
material. The reactor body really needs to be constructed of clear tubing so that
you can see what's going on and when it's time to add more kalkwasser. The use of
4" clear PVC will allow for the easiest construction because it is physically
compatible with the PVC pipe fittings you will also need to use. The problem with
4" clear PVC is the price, figure on about $20/foot for it and you will need
2 feet. I found 4" clear acrylic tubing at Aquatic
Eco-Systems for around $9.75/foot. Acrylic is much clearer (clear PVC has a
blue tint) but is harder to glue. I found that for low pressure applications that
you can use Home Depot's PVC/CPVC/ABS cement and primer. I have my reactor located
about 50' from my sump on the same floor so even though the tubing does run both
above and below the sump level in it's circuitous route to my sump, the head pressure
isn't too much and I could use that cement. Be careful with the primer because it
will etch the acrylic if it's is dripped onto it, which is another indication that
the cement is creating a chemical bond between the materials. If your setup requires
high pressure than Weld-On #40 2 part cement is the ticket. Of course if you opt
for the clear PVC than regular PVC cement will work. I used a hacksaw to cut my
Acrylic tubing into 6.5" long and 13" long pieces
The second difficult item for me to find was the plastic tubing to be used in
the recirculating pump assembly. I could not find small diameter plastic tubing
anywhere near where I live so I settled for 5/8" O.D. (1/2" I.D.) CPVC
tubing from Home Depot. It was a little larger than I originally desired but ended
up working fine. Drilling the holes for the 5/8" O.D. CPVC was somewhat of
a problem. First off, I was lucky enough to be able to borrow a 5/8" drill
bit as the cheapest I found one for was almost $16 at Walmart. Next, be careful
drilling if you are using the acrylic instead of the PVC. Make sure the glue is
thoroughly cured and go very slow. If your drill bit is new consider dulling it
a bit by drilling into some steel first. You will find that you cut right through
the PVC but going through the acrylic is another matter. Go slow, in short bursts,
and cool it with water if you can. Also, be careful not to elongate the holes in
the PVC while you're drilling through the acrylic. Since we are talking about the
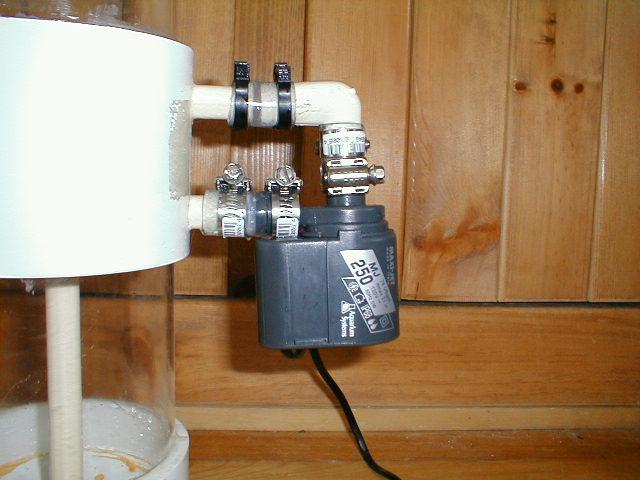
recirculating pump assembly , I used a Maxi Jet 250, 67 gph power head, and restricted
the input by almost 50% to slow it down even more. The object of the recirculation
pump is to stir up the kalkwasser without causing it to mix in with the upper saturated
(clear) portion of the reactor reservoir from where the output effluent is drawn.
I felt that the brand new maxi jet was just a little too powerful and hence I restricted
it. The pump only has to be run a few minutes at a time 4 to 6 times a day so this
should not be a problem in the long term.

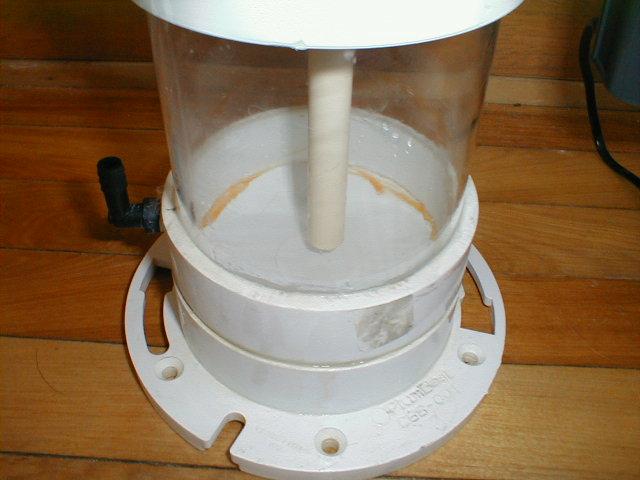
Next were the 4" PVC pipe fittings, all of which were procured at Home Depot.
A standard 4" slip coupling, a domed end cap, a clean-out cover and thread
collar, and a toilet closet plate to use as a stand. As suggested in the plans,
I cut the end cap leaving about 3/4" for the gluing surface, and used the part
I cut off to glue to the closet flange, and then to the end cap, to form a stand.
You will have to bevel the piece cut off the end cap to enable you to have enough
contact area with the end cap for a strong cemented connection. The slip coupling
and clean-out collar were attached unmodified but I should speak a little more about
the clean-out. I really wanted to find a cover which had a o-ring seal like the
one that is depicted in the plans but couldn't find one. The clean-out does work
but I have to use 2 or 3 layers of teflon tape every time I close it in order to
make a good seal. Another modification I made was to drill a hole and glue a piece
of rigid airline tubing to the center of the clean-out cap itself to create a nipple.
Attached to the nipple is a piece of flexible airline tubing and a plastic air valve.
Since this is the highest point in the Reactor it is used to bleed out any air trapped
when you replenish or service the reactor and to bleed off pressure when you are
about to open it. A reminder while I'm talking about opening up the reactor, don't
forget to insert a check valve in the outlet line so that when you do open the reactor,
all the water in the output tubing and sump doesn't come rushing out all over the
floor.
The last modification I made to the design was the water inlet and outlet to
the reactor. Since my Reef-filler used 3/8" I.D. tubing I wanted to make the
inlet and outlet that size. I also did not want the nipples for them to be on the
cap as in the plans. What I did was purchase 2 polypropylene 90 deg 1/2NPTx3/8"
barbs. I drilled and tapped a hole in the side of the clean-out collar for the output
and the side of the bottom end cap for the input. These locations have worked fine.
You can also find the barbs in larger or smaller sizes to fit your need.
COSTS: Clear 4" Tubing (2 ft) $17(Acrylic) $44(PVC)
 4" pipe fittings, cement,
1/2"CPVC(5/8" O.D.), barbs $22
Maxi Jet 250 $15
1/2"NPT Tap $7
hose clamps and
misc tubing $5
3/8" check valve $2.50
rigid airline tubing
and valve $4
_____ _____
TOTAL $65.50 $99.50
4" pipe fittings, cement,
1/2"CPVC(5/8" O.D.), barbs $22
Maxi Jet 250 $15
1/2"NPT Tap $7
hose clamps and
misc tubing $5
3/8" check valve $2.50
rigid airline tubing
and valve $4
_____ _____
TOTAL $65.50 $99.50
OPERATION:
I connected the input and output lines to the reactor and filled the chamber
with almost 2 gallons of DI water and 3 heaping teaspoons of kalkwasser. Next I
put teflon tape on the threads of the cover, wrapping the threads 3 times with the
tape, and then screwing on the cover. I turned on the Reef-filler just long enough
to bleed the air out of the reactor and then turned it off. Since the water in the
reactor was very cloudy caused by the initial filling, I let things stand for about
4 hours before turning on the system so I would not be pumping un-dissolved kalk
into my sump. I guess now is the time to talk about the mixing pump timer. The kalk
requires stirring about 4 to 6 times a day and really only for about 5 minutes each
time. I used a $5 timer I got at Home Depot for this purpose. I just happened to
have extra on/off tabs from my 2 other timers which I use for my lights so I was
able to get away with using a cheap timer. You will have to find a timer which allows
for at least 4 on/off cycles a day. The shortest duration that my timer will turn
on for is about 20-30 minutes so that's what I use, 4 times a day.
Once I turned on the system, it was a hands off operation. After a few days my
DKH was about 9.6 and Calcium was about 350. I then increased the amount of kalk
input to my tank by increasing the evaporation rate, and then adjusting the Reef-filler
to catch up with the new rate.
One concern I have is that the pH is up, ranging from 8.4x to 8.5x. I will keep
monitoring it and let you know if it continues to rise or stabilizes out.
PROGRESS: ** Updated 2/13/00 **
It's been about 2 weeks now since I started using my reactor. I'm a little disappointed
about the readings I getting but others who know more than I say that they are good
for just using kalk. My dKH is 9.8 and my Ca is 380-390 according to my Salifert
test kits.
As for problems with the reactor itself, the only annoyance is that as mentioned
earlier, the cap is hard to seal. Often times this means a few drops a day making
it to the floor. I've placed a plastic plate under the reactor to collect this excess.
I plan on trying Teflon paste as it's supposed to seal better and is also supposed
to be reef safe.
Also, I have not been able go get more than about 5 days before recharging, I
was hoping for a minimum of 7. I must say that I have not experimented much with
the amount of kalk I charge the reactor withàsomething I will start doing
next week. ** UPDATE ** I can now easily get 7-10 days out of the reactor. My next
goal will be 14. I think another spoon of Kalk will do that. This may all be for
naught because I've just ordered some pickeling lime, $1.49/lb vs $9/lb for kalk,
so I may be in for some more experimentation. I'll let you know how it works out.
pH continues to be somewhat high ranging from 8.30 to 8.56. I noticed that if
I recharge before it's time my ph increases a point to 8.4 - 8.66. It is possible
that adding more kalk before it's depleted and not letting it sit for a few hours
causes a more milky effluent to get to the sump. Or, it means I need to increase
the initial charge to better saturate the reactor, which may result in both longer
times between recharge and higher Ca readings. One installation task I performed
was to allow the output tubing fron the reactor to rise straight up to around 6
feet before turning and heading for the tank. This allows for 6 feet of settling
which I think keeps the undisolved kalk out of the sump. ** UPDATE ** It seems that
my pH meter went out of cal DOH! A recal brought my pH range between about 8.28
and 8.49.
Another thing I've discovered is that I can tell when it's time for a recharge
without looking at the reactor. All I have to do is look at my Pinpoint pH meter.
My pH will drop a full point when the reactor effluent drops below a pH of 12. So
if I get up in the morning and my pH is 8.20 I know it's time to recharge the reactor
and if it's 8.3 when I get home from work it's time to recharge. This means that
if you have an accurate way to measure pH you can probably get away with using only
plain white PVC in your reactor and saving the cost of the clear pipe.
*UPDATE*
Just thought I'd give you a short update on my Reactor. It's still working fine
and after almost 4 months of use I took it apart to give it it's first cleaning.
To my suprise it really didn't need any cleaning, nothing was clogged, no kalk buildup,
and most suprising was that the Max-Jet 250 powerhead was clean, and looked brand
new. The 4 months of use where it circulated the Kalkwasser solution 6 times a day
had absoultly no effect on the pump or impeller...cool
Also, I have switched to Mrs Wages Pickeling Lime with no noticable affects. Here's
what Craig Bingman has to say about it.
Craig Bingman wrote:
"Mrs. Wages is FCC grade (Food Chemical Codex) lime. It is probably as good
a grade as most of the calcium hydroxide on the aquarium market. The aquarium lime
products hold their sources and the grade used pretty close to their chest. ;-)"
"Since Ms. Wage's lime is seasonal in nature, by this time of year, it has
been sitting on the shelves for at least six months. So it may have absorbed some
carbon dioxide from the atmosphere by the time you use it. Conesquentially, when
I use food grade lime, I use more to be sure that I get a saturated limewater product.
Given how inexpensive the food grade lime is compared to aquarium lime, there isn't
much financial penalty to using a little extra."
"For that matter, one never knows how long that lime has sat on the shelf at
the fish store, either. One additional comment. The food grade limes that I've seen
appear to be A bit more coarse than the product from TLF. That meAns that the TLF
lime will dissolve somewhat more rapidly then the food grade limes you get from
the supermarket. That is a desirable property, especially if people want to mix
lime with minimal effort. As in they might prefer their limewater "shaken,
not stirred.""
"Because I found phosphate rejection more efficient when limewater was vigorously
mixed and then allowed to stand overnight, the particle size issue isn't that big
a deal for me, but it might be for individuals who go to lesser lengths to make
a saturated solution.
Craig"
http://www.viaweb.com/mrswages/mrswagpiclim.html
*UPDATE* June 00
I've switched back to ESV kalk in June of 00. As Craig states above, the lime is
more course that the ESV Kalk and because of that, I went through 2 impellers on
the maxijet in a couple of months since starting the lime. As I type this update
it is now 20 Oct 00 and the Maxijet wear is back to normal, which is no wear from
the ESV kalk.
*UPDATE* Nov 01
Reactor still working great. Using ESV kalk and current readings are Ca at 500+
and dKH at 13.6
Who said you couldnt use PVC cement :)